
CodeIgniter Basic Crud Application Part-II
10/04/2019 . 17 minutes, 55 seconds to read . Posted by Admin#php #learnphp #phpframework #phpcrud #crud #phpcode #phpcodeigniter #codeigniter #phpdatabase #crudincodeigniter #codeignitercrud
Overview
In this part of the tutorial, we will begin with the crud in the CodeIgniter.In this part, we will perform two basic operations of crud (Insert, Read) in CodeIgniter.CodeIgniter is an MVC (Model, View, Controller) base framework widely used to enhance the development. Before getting started with this part, read the first part of the tutorial. For part-I click on the link https://www.coderanks.com/crud/codeIgniter-part-I.
We will build our crud application step by step follow as
- Create Database
- Configure Database Settings
- Load Libraries
- Insert Data
- Read Data
Before starting our crud application you should have studied pre-requisite of this tutorial.
Pre-Requisite
- Part-I of the tutorial must be studied first.
- Basics of the codeigniter.
- Basic Database Queries
- HTML Forms
Requirements
- xampp or wamp server
- Codeigniter Setup
- PHP IDE (recommended vs code)
Let's follow step by step procedure and get started building basic crud application.
Step 1: Create a Database
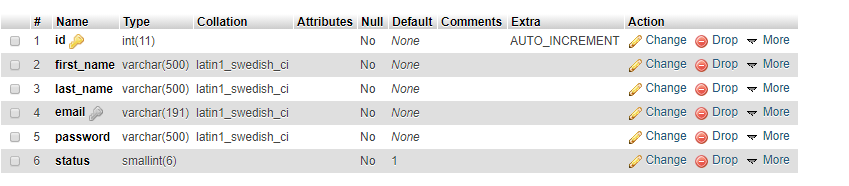
We use the database to store the data because in future it can be analyzed to provide business decisions. Before creating the database make sure you have started your wamp /xampp server. To create database type localhost/phpmyadmin in your browser and create a new database name it `crud`. In the same database create a new table and name it 'user' and follow the same structure for the table given below in the image.
Table `user` structure
Once we have created the database and the table. We need to connect our application with the server database. In our next Step, we will configure our application database settings to establish a connection with the database.
Step 2: Configure Database Settings
CodeIgniter is a fully functional framework. It supports database and can send receive data to the server. To establish the connection with the database we need to configure settings of the database in our basic crud application.CodeIgniter has a separate file for the database settings. In our application, this file is located in application/config/. Open application folder of the application and find the config folder inside the application folder. Open config folder and find database.php inside the config folder open the file and you will see configuration setting code in the file as mention below in the image.
application/config/database.php
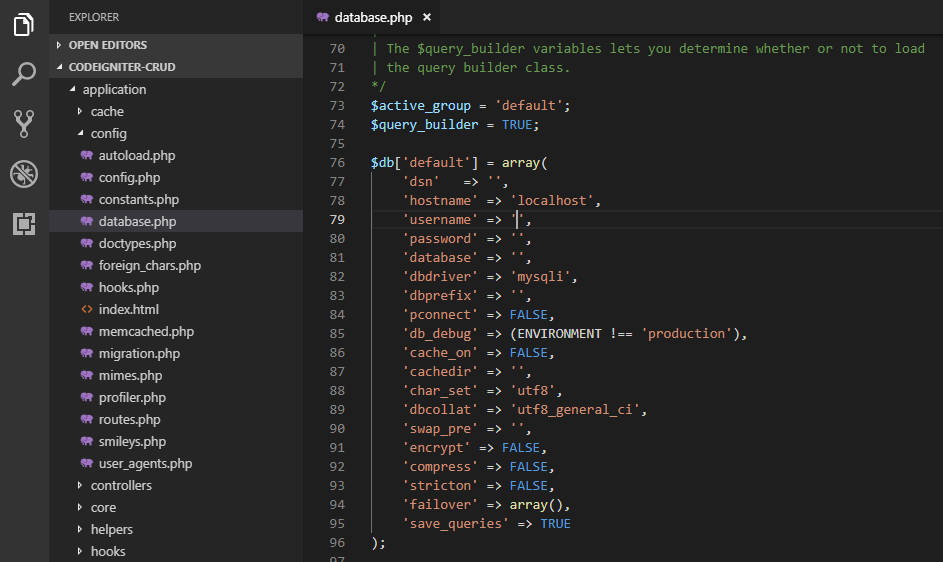
In the above image, you can see initially the settings for the connection to the database are empty. We need to configure it according to our application. The connection consists of four primary parameters, the first three parameters are used for authentication.
- Host server name if you are using wamp/xampp your host server name is localhost and is default name.
- username user name refers to the user of the server. In xampp/wamp root is set as default user of the server in my case my server user name is root and you may have your own user name.
- password in xampp/wamp user has the choice to set the pass. In my case, I have not set a password for the user root. My password is empty if you are using root your password is not set.
- database name in our server we may have many databases. To connect with the server we need to tell the server which database we are going to use. In our case, we already have created database 'crud'.You can create a database with any name.
Let's configure connection settings. To configure connection settings fill the server credentials and also database name. The code for the connection to the database is given below and you can replace credentials with your server credentials.
$active_group = 'default';
$query_builder = TRUE;

$db['default'] = array(
	'dsn'	=> '',
	'hostname' => 'localhost',
	'username' => 'root',
	'password' => '',
	'database' => 'crud',
	'dbdriver' => 'mysqli',
	'dbprefix' => '',
	'pconnect' => FALSE,
	'db_debug' => (ENVIRONMENT !== 'production'),
	'cache_on' => FALSE,
	'cachedir' => '',
	'char_set' => 'utf8',
	'dbcollat' => 'utf8_general_ci',
	'swap_pre' => '',
	'encrypt' => FALSE,
	'compress' => FALSE,
	'stricton' => FALSE,
	'failover' => array(),
	'save_queries' => TRUE
);
We have already configured connection setting but still, we are unable to load data from the server because we haven't loaded database library for the application. In the next step, we will load the database library to use the database queries.
Step 3: Load Database Library
Database library is used to execute the queries for the server. It is used to send the request to the server for the data. To load database library open application/config in the folder you will find autoload.php open the file and find autoload libraries array. You can see the image given below-containing directory structure.
application/config/autoload.php

In the above image, the directory structure is mentioned and we see an empty array of autoload libraries, fill the array with the keyword database. You can copy the code given below.
$autoload['libraries'] = array('database');we have loaded database library. Let's get started with the first operation of the crud(Insert) record in the database.
Step 4: Insert Record
We are going to perform the first basic of operation of crud in the codeigniter before starting I want to remind you, go through the Part-I of the tutorial and learn basics of the codeigniter. Let's start building our crud application, we will proceed step by step.
step 1: Create a new view file in the application/views/user/ name it add.php and make an HTML form in the view, the code for the HTML form is given below.
application/views/user/add.php
<!DOCTYPE HTML>
<html>
<head>
    <title>Codeginiter Basic CRUD Application</title>
    <link rel="stylesheet" href="https://maxcdn.bootstrapcdn.com/bootstrap/3.3.7/css/bootstrap.min.css" />
</head>
<body>
    <div class="container">
        <div class="page-header">
            <h1>Create User</h1>
        </div>
        <form action="" method="post">
            First Name
            <input type='text' name='first_name' class='form-control' />
            <br>
            Last Name
            <input type='text' name='last_name' class='form-control' />
            <br>
            Email
            <input type='email' name='email' class='form-control' />
            <br>
            Password
            <input type='password' name='password' class='form-control' />
            <br>
            <input type='submit' value='Save' class='btn btn-primary' />
            <a href="#" class='btn btn-danger'>Back to User List</a>
        </form>
    </div>
    <script src="https://code.jquery.com/jquery-3.2.1.min.js"></script>
    <script src="https://maxcdn.bootstrapcdn.com/bootstrap/3.3.7/js/bootstrap.min.js"></script>
</body>
</html>
In the above code, we have not defined form action yet in the, we will define it later,.I want to mention that the input fields name are important ,always use same name for the columns of the table and input fields as I have used the same name for the fields as defined of the database columns, later I will tell you why it is important. Let's check our output to check the output type http://localhost/codeigniter-crud/index.php/user/add in the browser and in output, we will get error mention below in the image. The reason for the error is mention below after the image.
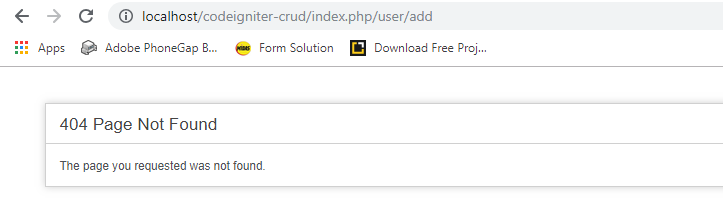
In the above image, we see 404 page not found error if you see the URL after index.php you see user/add the user is the controller and the add is the function in the controller we faced this error because we have not define add function in user controller. Let's resolve the error to do so go to application/controllers and open User.php /user controller in the controller define new method name it add and in the method load the user/add the view, it is very simple the code is given below.
<?php
class User extends CI_Controller
{
public function add()
{
$this->load->view('user/add');
}
}
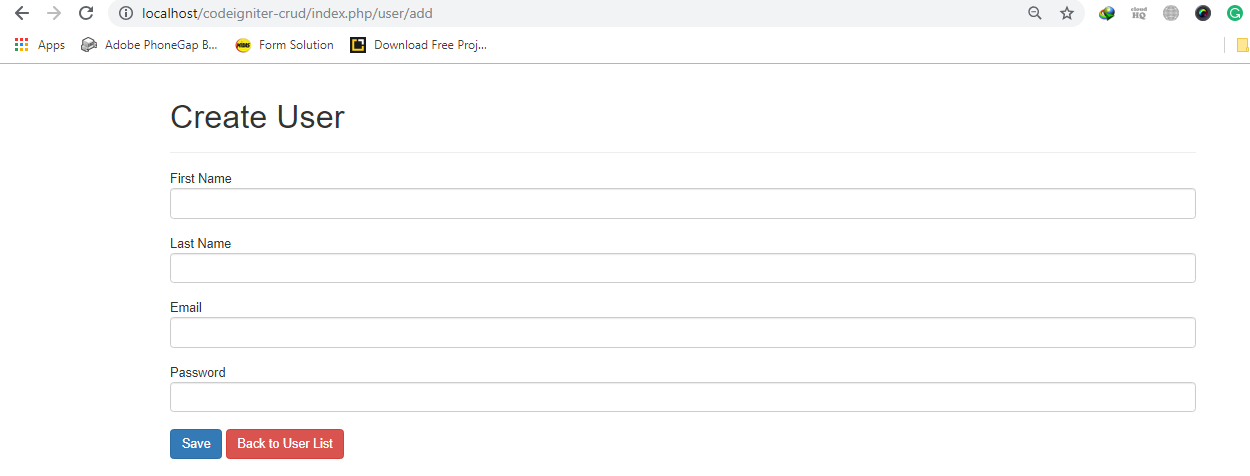
?>After adding this code to user controller refresh the browser page and you will see an HTML form on the screen given below in the image.
We have successfully created form to add a new user but save button is not working because we have not define form action, as I explained to you that the view cannot be directly loaded in the browser the view is loaded by the controller, so what we need to do is make a new method in the user controller and name it "save" in this method we will get inputted data by using $this->input->post, we have used method post in the form that's why I have used post if you are using get method change this line to $this->input->get(), this line of code will receive an array of data from the view, I will show you how data is stored in the array. The save method code is given below you can copy this code.
<?php
class User extends CI_Controller
{
   public function add()
   {
     $this->load->view('user/add');
   }
   public function save()
   {
     $post=$this->input->post();
   }

}
?>
In the above code, we have created a function that will receive data from the view using the post request.Let's go to view and set the form action to pass the data from view to controller. Open application/views/user folder and in the add.php set the form action, the form action consist of three primary parameters.
1) base_url()
2) Controller Name
3 ) Controller method
The action is the URL link to the controller method. The example is given below in the code.
application/views/user/add.php
<!DOCTYPE HTML>
<html>
<head>
    <title>Codeginiter Basic CRUD Application</title>
    <link rel="stylesheet" href="https://maxcdn.bootstrapcdn.com/bootstrap/3.3.7/css/bootstrap.min.css" />
</head>
<body>
    <div class="container">
        <br>
        <?php if(isset($value)&&isset($msg)) {?>
        <div class="alert alert-<?=($value==1)?'success':'danger'?>">
            <?=$msg?>
            <button class="close">x</button>
        </div>
        <?php }?>
        <div class="page-header">
            <h1>Create User</h1>
        </div>
        <form action="<?=base_url()?>index.php/user/save" method="post">
            First Name
            <input type='text' name='first_name' class='form-control' />
            <br>
            Last Name
            <input type='text' name='last_name' class='form-control' />
            <br>
            Email
            <input type='email' name='email' class='form-control' />
            <br>
            Password
            <input type='password' name='password' class='form-control' />
            <br>
            <input type='submit' value='Save' class='btn btn-primary' />
            <a href="<?=base_url()?>" class='btn btn-danger'>Back to User List</a>
        </form>
    </div>
    <script src="https://code.jquery.com/jquery-3.2.1.min.js"></script>
    <script src="https://maxcdn.bootstrapcdn.com/bootstrap/3.3.7/js/bootstrap.min.js"></script>
</body>
</html>
In the above code, we have set form action to the save method of the user controller when the save button will be clicked the form will be posted to the save method of the user controller let's see if we are getting data in the controller or not to test echo the $post variable and use exit method to check the output on the screen. The code is given below
application/controllers/User.php
<?php
class User extends CI_Controller
{
   public function add()
   {
     $this->load->view('user/add');
   }
   public function save()
   {
     $post=$this->input->post();
     echo '<pre>',print_r($post);exit;
   }

}
?>
Let's run the above code and check the output to run the code type http://localhost/codeigniter-crud/index.php/user/add in the browser and you will see HTML form to create a new user given below in the image.
output
Enter some values in the textbox and click on the save button, this form will be posted to the URL we have given in the action and in the output we will get an array with the keys and values the image for the output is given below.
output

We have filled the form now click the save button you will get the following output on the screen given below in the image
The output on save
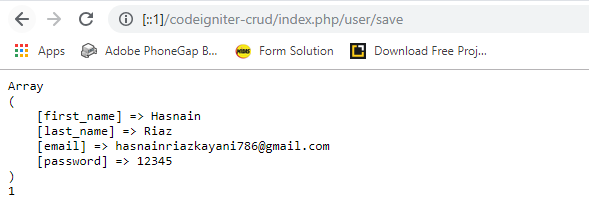
In the above you can see an array value the values we have entered in the form and posted these to the controller function,the array keys in the array are the name of the input fields in the table and it every key has its own value, this is how the array is created in the codeigniter.
Let's save the data in the database table to do this we need to define a method in the controller which will get the array from the controller and save the data to the server. Open application/model/UserModel.php and make a new method name it insert, the insert method will receive an array as a parameter it will look like insert($data). In this method we will write the query to insert the data in the table, codeigniter has its own queries functions if you are not familiar with the codeigniter query builder classes and functions you can click the link https://www.codeigniter.com/userguide3/database/query_builder.html. The syntax for the insert query is very simple in the codeigniter given below in the code.
application/model/UserModel.php
<?php
class UserModel extends CI_Model
{
    public function insert($data)
    {
        return $this->db->insert('user',$data);
    }
}
?>
In the above we have used DB class and insert method to insert the data in the database, still, after making method in the model what we need to do is call this method in the controller and pass it data array,open application.controllers/User.php in the user controller we already have defined save method in save method we will call the insert method of the UserModel but before calling the insert method we need to load the model in the controller, To load the model add a constructor method in the controller and this method should override parent constructor, and in the construct method add the following line of code $this->load->model('UserModel') or copy the code given below.
application/controllers/User.php
<?php
class User extends CI_Controller
{
  public function __construct()
  {
    parent::__construct();
    $this->load->Model('UserModel');
  }
   public function add()
   {
     $this->load->view('user/add');
   }
   public function save()
   {
     $post=$this->input->post();
     echo '<pre>',print_r($post);exit;
   }

}
?>
After loading the model call the insert method of the UserModel in the save method of the user controller, to call the method add the following line of code in the save method $this->UserModel->insert($post), or copy the code given below.
application/controllers/user.php
<?php
class User extends CI_Controller
{
  public function __construct()
  {
    parent::__construct();
    $this->load->Model('UserModel');
  }
   public function add()
   {
     $this->load->view('user/add');
   }
   public function save()
   {
     $post=$this->input->post();
     $res=$this->UserModel->insert($post);
     if($res)
     {
       $data['value']=1;
        $data['msg']='record added successfully';
     }
     else
     {
        $data['value']=0;
        $data['msg']='record added failed';
     }
     $this->load->view('user/add',$data);
   }

}
?>
Let's run the above code and see the output of the code.
Output
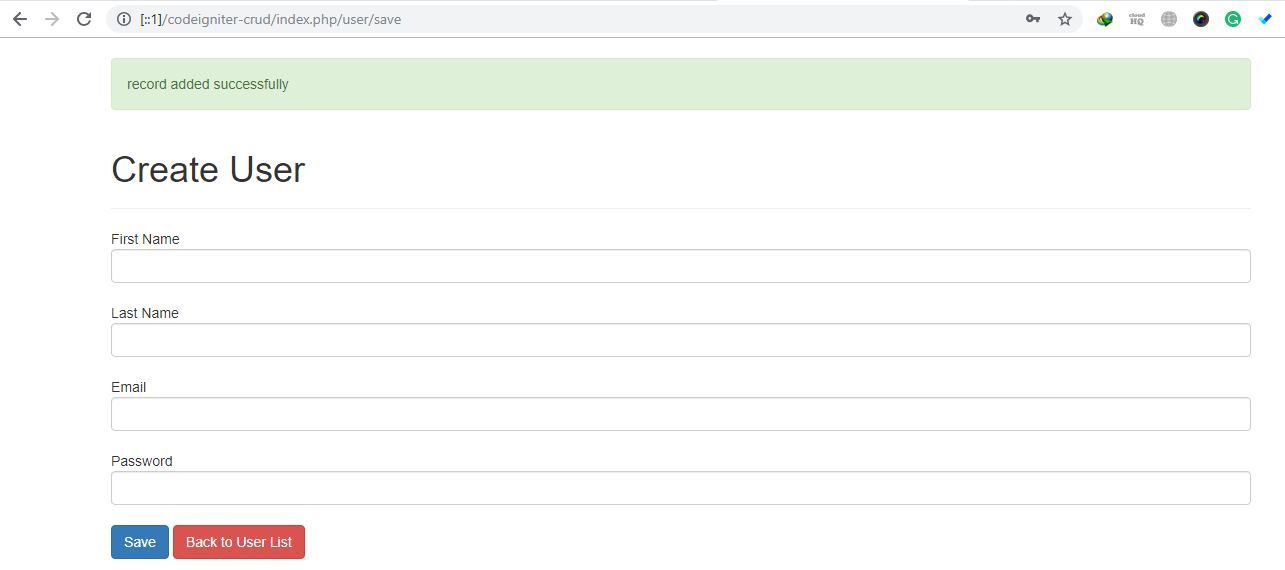
We got a success message, we have inserted a record in the table let's check the record in the database.
Database table record
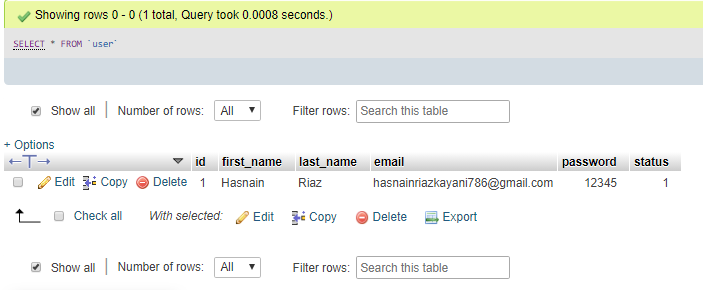
We have successfully added a record to the database and our next step is to read the database records, Let's move to the next step.
Step 5: Read Records
Reading a record from the database is the second basic operation in the CRUD. In our application, we already have created records. In this step, we will read records from the database table and display them in the user interface. Let's make flow for reading the records from the database.
First, we will create a method in the controller that will load the view with the data, after creating the method in the controller we will query the data from the database table by creating a method in the model and at the last, we will create a view and display the data in the view. Let's get started open application/controllers User.php controller and in the user, controller define a new method index inside method we will call the model function and pass the data to the view. The code is given below.
application/controllers/User.php
<?php
class User extends CI_Controller
{
  public function __construct()
  {
    parent::__construct();
    $this->load->Model('UserModel');
  }
  public function index()
  {
    $data=$this->UserModel->read();
    $this->load->view('user/index',$data);
  }
   public function add()
   {
     $this->load->view('user/add');
   }
   public function save()
   {
     $post=$this->input->post();
     $res=$this->UserModel->insert($post);
     if($res)
     {
       $data['value']=1;
        $data['msg']='record added successfully';
     }
     else
     {
        $data['value']=0;
        $data['msg']='record added failed';
     }
     $this->load->view('user/add',$data);
   }

}
?>
In the above code, we called models method that does not exists let's define the method in the model that will query the data from the database table. Open application/models/UserModel.php inside the model class defines a function read and apply select query $this->db->get('user') in the method it will retrieve all the records from the database, and result_array() will make an array of the data. view the code given below.
application/models/UserModel.php
<?php
class UserModel extends CI_Model
{
    public function insert($data)
    {
        return $this->db->insert('user',$data);
    }
    public function read()
    {
        return $this->db->get('user')
                        ->result_array();
    }
}
?>
In the above code, we have query the database from the database and return the result in an array and we already got the array in the controller, Let's create the view and display the data in the view. Open application/views/user create a new file in the user folder and name it index.php in the file create a table will be used to display records inside the table apply foreach loop on table data. Copy the given below code
application/views/user
<!DOCTYPE HTML>
<html>

<head>
    <title>Codeginiter CRUD Application</title>
    <link rel="stylesheet" href="https://maxcdn.bootstrapcdn.com/bootstrap/3.3.7/css/bootstrap.min.css" />

</head>

<body>
    <div class="container">
        <div class="page-header">
            <h1>Users List</h1>
        </div>
        <br />
        <a href='<?=base_url()?>/index.php/user/add' class='btn btn-primary m-b-1em'>Add New User</a>
        <br />
         <table class='table table-hover table-responsive table-bordered'>
            <br />
            <?php if(count($users)>0){?>
            <thead>
                <tr>
                    <th>ID</th>
                    <th>First Name</th>
                    <th>Last Name</th>
                    <th>Email</th>
                    <th>Action</th>
                </tr>
            <tbody>
                <?php $count=1;
                foreach($users as $user){ ?>
                <tr>
                    <td> <?= $count++ ?> </td>
                    <td> <?= $user['first_name'] ?> </td>
                    <td> <?= $user['last_name'] ?> </td>
                    <td> <?= $user['email'] ?> </td>
                    <td>
                        <a href='#' class='btn btn-primary m-r-1em'>Edit</a>

                        <a href="#" onclick='return confirm("Do you want to delete")'
                            class='btn btn-danger'>Delete</a>
                    </td>
                </tr>

            </tbody>
            <?php } }
        else{
            echo "<div class='alert alert-danger'>No records found.</div>";
        }
        ?>
        </table>
    </div>
    <script src="https://code.jquery.com/jquery-3.2.1.min.js"></script>
    <script src="https://maxcdn.bootstrapcdn.com/bootstrap/3.3.7/js/bootstrap.min.js"></script>
</body>

</html>
In the above code, we have listed user records in the view lets check the output. To see output type http://localhost/codeigniter-crud/ in the browser and you will get the same output given below in the image.
Output
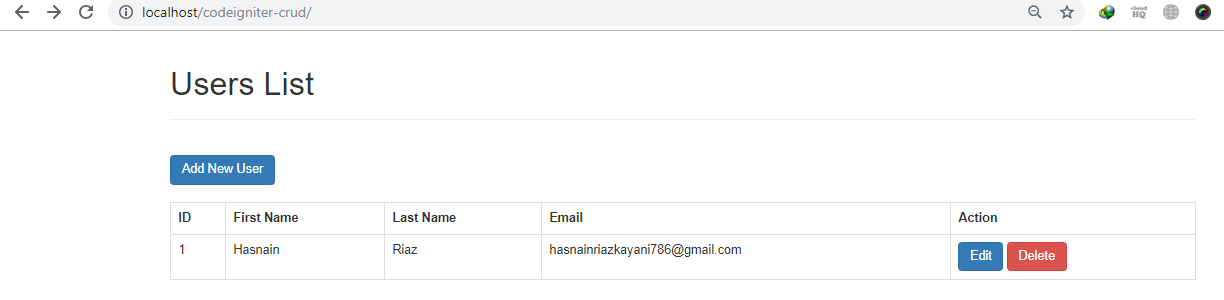
In the above, you see we have read database records successfully. We have successfully completed two basic operations of crud (Create, Read). That's it for this part.
In the next part, we will perform the remaining two basic operations of the crud (Update, Delete). For part-III click on the link.
Important Points
- The functions in the controller should be public.
- The function in the model should be public.
- Load all required libararies.
- Becareful while writing php in HTML.
Thanks for your concentration Hope you have learned two basic operations of crud in Codeigniter.